During cabinet installation or refinishing, the proper installation of hinges not only affects how smoothly the doors open and close, but also has a direct bearing on the longevity and aesthetics of the entire cabinet. Whether you are a retailer, home improvement company, or wholesaler, knowing the proper installation methods and choosing custom cabinet door hinges or high quality cabinet door hinges wholesale are the keys to a professional installation.
Pre-installation Preparation
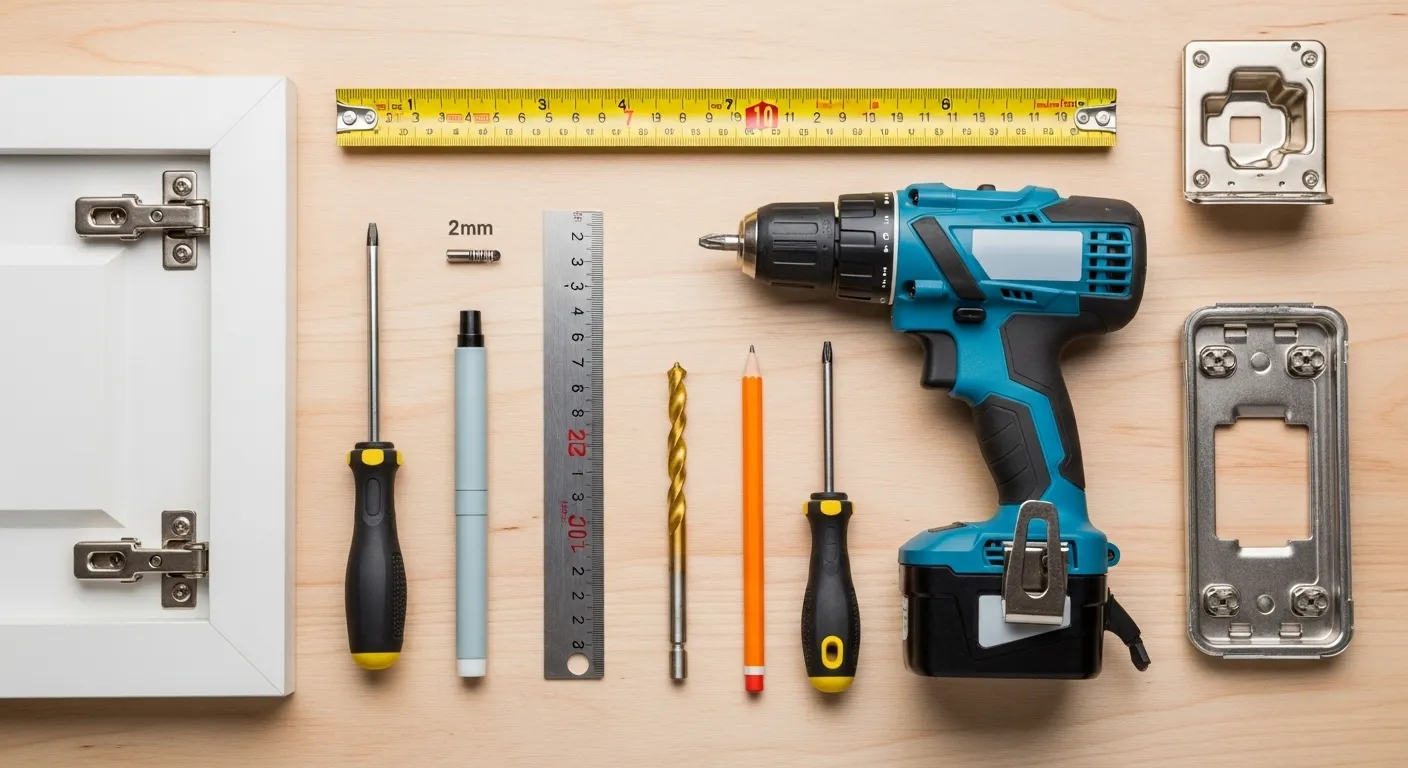
Before formal operation, be sure to prepare the following tools and materials to ensure that the subsequent steps are carried out smoothly:
- Drill or screwdriver: An adjustable speed drill is recommended.
- Tape measure / ruler: to measure the hinge positioning distance.
- 2mm and 35mm drill bits: 2mm for pilot holes and 35mm for hinge cups.
- Hinge Components: Including Cup, Mounting Plate, Connecting Screws, etc.
- Pencil or marker: Mark the installation position.
- Cabinet Doors and Cabinets: Confirmation of size match is required in advance.
Tips: If you are purchasing custom cabinet door hinges, please confirm whether the hinge model and the pre-processed holes of the door panel are the same at this stage to avoid errors.
Step 1: Determine Hinge Mounting Location

Measure the Upper and Lower Edges
- Measure approximately 100mm down from the top edge of the cabinet door to make a mark, and similarly measure 100mm up from the bottom edge to make a second mark.
- If the door height exceeds 600mm, it is recommended to add another hinge position in the center to share the weight.
Lateral Positioning
- Leave a margin of 3 mm- 4 mm at the side edges of the door (in the thickness direction) to ensure that the door will not catch against the cabinet when it is opened and closed.
- On the marking line, use a pencil to draw a vertical line along the door thickness direction as the centerline of the cup hole.
This section also highlights the versatility of cabinet door hinges wholesale.
Step 2: Cut Holes in Cabinet Doors
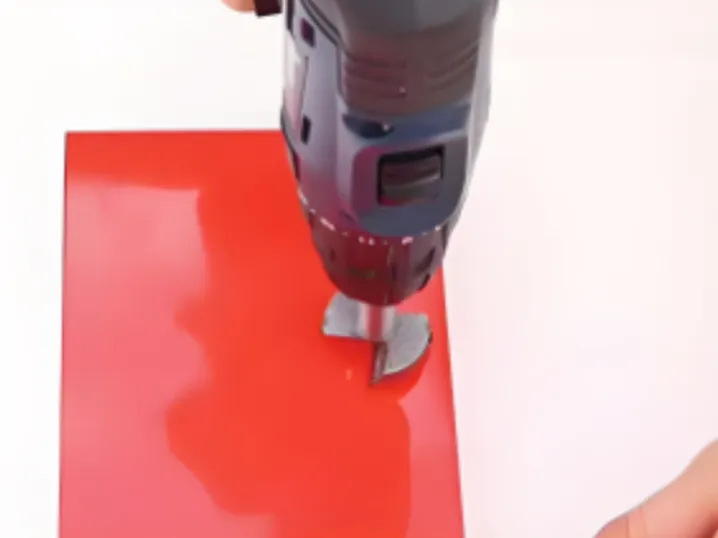
Punch 2mm guide holes
- At the center of each marked point, drill a guide hole vertically with a 2mm drill bit to a depth of approximately 3-4mm to prevent slippage of the larger drill bit.
Make 35mm cup holes
- Load the 35mm cup hole drill bit into the drill and adjust the depth limit (normally 11.5mm).
- Align the guide hole and drill vertically at medium speed, keeping the strength even to avoid skewing.
Cleaning debris in the hole
- Use a small brush or air blow to clean the wood chips in the hole to ensure the cup holder can be leveled in place.
Note: If the hole depth is too shallow, the hinge cups will not be able to be inserted; if it is too deep, the door structure will be weakened.
Step 3: Install Hinged Cup Holder (Cup)
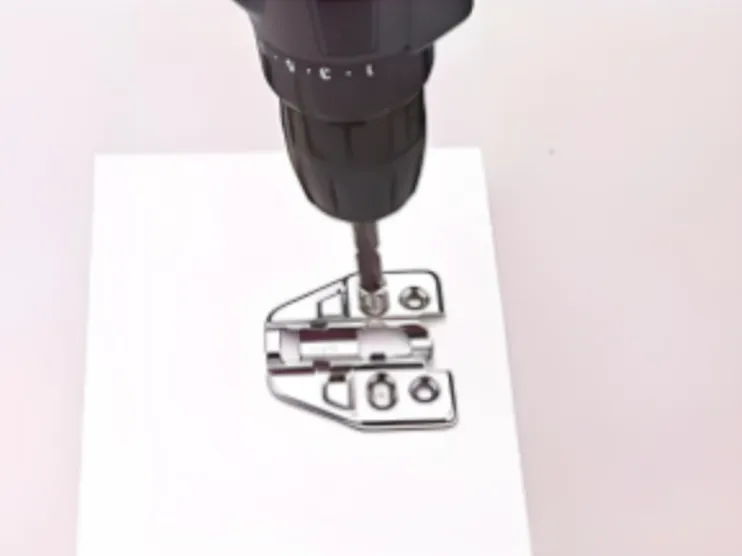
Place Cup Holder
Align the hinge cups with the cup holes and insert them smoothly, making sure that the sides of the cups are flush with the surface of the door panel.
Fixing screws
Using the matching short screws, pass through the two holes on the hinge cups, first hand-tighten and then micro-twist with an electric drill, applying even pressure to avoid the screws slipping their teeth.
Check the stability
Slightly shake the hinge cup by hand to make sure there is no looseness. If there is any looseness, you can increase the screws moderately to tighten the state.
Customized Tip: If you are using custom cabinet door hinges with cushioning function, please confirm the cushioning direction marking in advance to ensure correct installation.
Step 4: Mounting Plate to Cabinet
Pre-mark the position of the mounting plate
Lean the cabinet door against the cabinet body, keep the door panel level, and use a pencil to mark two screw holes at the corresponding positions on the inside of the cabinet side panel.
Punching guide holes
Also use a 2mm drill bit to drill pilot holes to a depth of about 3mm to prevent the screws from being deflected when mounting the base.
Mounting the base
Align the markings, lay the base flat and fix it with screws. For quick release bases, press the base to snap it into place without the need for additional screws.
Step 5: Attach Hinges and Adjust Door Seam
Snap Hinges
Align the hinge cups on the door panel with the base clips and press gently until you hear a “click” to complete the initial positioning.
Left/Right Fine Adjustment
Turn the left and right adjustment screws on the hinges clockwise/counterclockwise to maintain an even gap between the door and the side of the cabinet of about 2mm.
Upper and lower fine adjustment
Adjust the height of the door panel through the upper and lower adjusting screws on the base side to make the upper and lower gaps uniform.
Forward and backward fine-tuning
Use the front and rear adjusting screws to control the door plane to align with the cabinet panel.
Test opening and closing
After finishing the fine-tuning, open and close the door several times to make sure the opening and closing is smooth and no noise.
Professional advice: If mass installation or project-based bulk construction is required, it is recommended to use cabinet door hinges wholesale models that support quick adjustment and tool-free installation, which can greatly improve efficiency.
Common Installation Problems and Solutions
| Issue | Solution |
|---|---|
| Loose door panel | Re-tighten the screws on the hinge cup or mounting plate, and check if the threads are damaged. |
| Uneven gap | Follow the left/right, up/down, and front/back adjustment methods in Step 5 to fine-tune until satisfied. |
| Door won’t close | Check the installation direction of the soft-close hinge or adjust the closing angle; if the issue persists, replace with a standard hinge for troubleshooting. |
| Hinge noise | Apply a small amount of lubricant to the moving parts, or switch to a premium model with an integrated damping pad to reduce noise. |
Why Choose Baoertai Hardware?

As a professional manufacturer of cabinet door hinges, Baoertai Hardware provides high-quality and personalized customized hardware solutions for global buyers:
- Manufacturer direct supply: automated production line, full quality control.
- OEM/ODM service: support custom cabinet door hinges full customization.
- Flexible MOQ: Starting from 30,000 to 50,000 pieces to satisfy retailers/wholesalers/home decoration companies.
- Fast sampling: 3-5 days sample shipment, adjust as needed.
- Multi-layer antirust plating: long-lasting and durable, adaptable to various usage environments.
- Abundant material choices: cold rolled steel, stainless steel, various alloys on demand.
- Diversified functions: cushioning, bouncing, dismounting, quick release and other structures in any combination.
Summarize
Through the above five detailed steps, you can easily master the correct installation method of cabinet door hinges. Whether you are installing a single door panel or a large number of projects, you can rely on this guide to achieve efficient, precise and professional installation results. Choose Baoertai Hardware‘s custom cabinet door hinges or cabinet door hinges wholesale service for quality products, full customization support and flexible wholesale solutions.